
 |
I have another inspiring / positive project which will surely lift your spirits and (hopefully) bring a smile to the face of that special person that you love!
Today's project is part of my collaboration with Xyron since I'm a member of their design team! This means you will be seeing a Xyron machine in action! For this particular project, I will be showcasing the Xyron® 3” Sticker Maker. I've talked about this sticker maker before, so if you want to learn more about this machine, then click here.
Also, in this project, I will be using items from Lawn Fawn! Now if you have never heard of Lawn Fawn, they are a company which makes ADORABLE stamps and lawn cuts (die cuts)! You have probably seen some of their critter stamps and lawn cuts, used in a variety of card projects on the internet. Besides stamps and lawn cuts they also make paper packs and other crafting supplies.
I've been wanted to use Lawn Fawn's products for the longest time because their critter stamps / lawn cuts are my jam! They are just super cute and (based on the DIYs I've seen) can be used in a variety of projects. For this month's project, I went with their brand new Believe in Yourself stamp and lawn cuts because it's not only inspiring, but involves a jackalope!
I mean, you can never go wrong with a jackalope!
Let's get crafty!
♥ ♥ ♥
 |
Supplies
Believe in Yourself - Stamp Set
Die-Cut Machine (I'm using Cuttlebug) (not pictured)
White Cardstock
Plastic Bags
Brutus Monroe Detail Ink Raven
Acrylic Block
Markers
Decorative Scissors (optional / not pictured)
Scissors
 |
Step 1: Grab your Lawn Cut and your white cardstock. Then follow the directions for your specific die cut machine and begin cutting out your pieces.
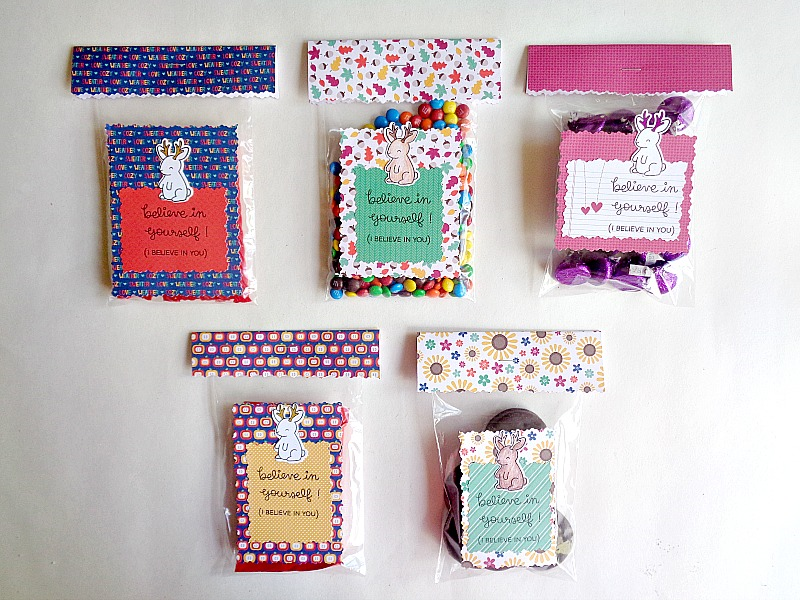
I ended up cutting out 5 little jackalopes.
 |
Step 2: Once you have your die cuts, grab your
Believe in Yourself
stamp set, paper pack, and markers! First you will want to stamp out your jackalope and phrases. To do this, simply adhere your jackalope stamp to an acrylic block and stamp the image on top of your jackalope die cut. Then switch out the jackalope stamp and adhere your phases onto your acrylic block. Then begin stamping out your phrases on varies patterned paper.
Finally, to make your jackalopes pop, color in your little die cuts with your markers.
Once you have all your pieces stamped, you will want to cut out your phases (in the shape of a square) and some extra patterned paper (for layering purposes) using your scissors.
Crafty Tip: If you can't cut in a straight line to save your life (like me), then paper punches would be a perfect alternative then cutting out each of your paper pieces by hand!
 |
Step 3: Grab all of your paper pieces and begin sliding them through your Xyron 3 Inch Sticker Maker. In the above photo, you will see how I ran one of my stamped phrase paper pieces through the sticker maker.
Keep repeating this process until you have run each paper piece through your Xyron Sticker Maker.
 |
Step 4: Grab a small bag and the specific paper pieces that you want to use for that bag. Now take each piece and rub the top of the sticker paper. Then peel each piece of paper off the sticker paper and adhere them to your bag.
I decided to go with a layered look of a patterned piece of paper, my stamped phrase and then finally my die cut jackalope.
 |
Step 5: To decorate the top of your bag, take a piece of patterned paper (that is a little longer than the width of your bag) and fold it in half. The cut as much off the bottom as you want with either your normal scissors or decorative scissors.
Now fill up the bag with your goodies! Once you bag is filled, open up your folded piece of patterned paper (that we just made) and place your bag in between the fold. Then take your stapler and staple your piece of patterned paper to your bag.
Once everything is all stapled, then you are done!
 |
 |
 |
 |
 |
 |
♥ ♥ ♥
Also, in case you're wondering, these lunchbox motivators are designed to be added into a lunchbox in order to give that person you love a little extra encouragement! I ended up making five different lunchbox motivators, to show you a few different ways that you could decorate your bags. Along those same lines, I also wanted to give you some ideas of goodies that you could use to fill your bags up with! As you can tell, I went the sweet route (lol)!


No comments
I love comments, so thank you for taking the time to leave one. :)